
Planting
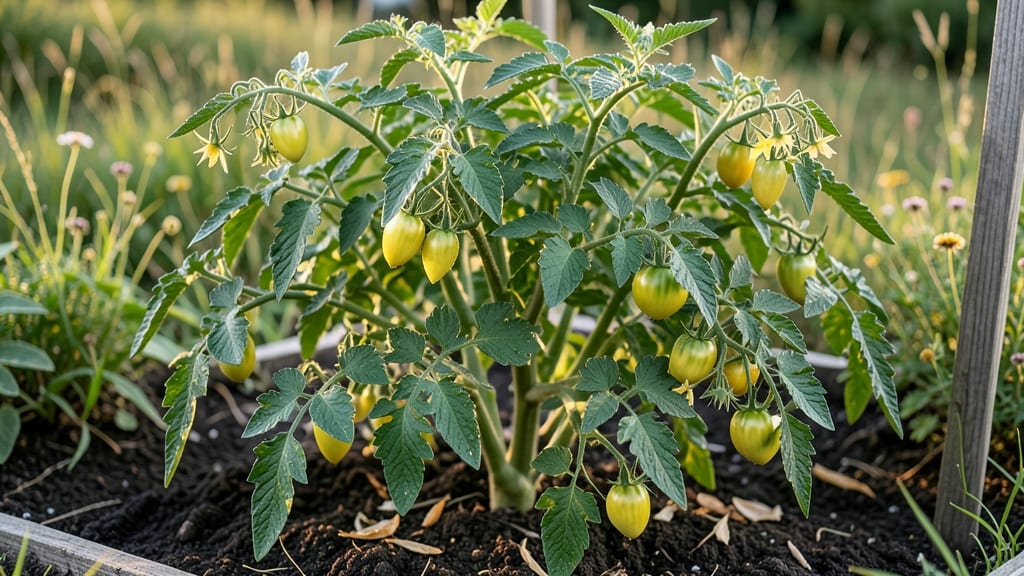
Growing a yellow pear tomato plant in your backyard or balcony is like having a sun-kissed treasure that fits anywhere. 🌞 These compact wonders produce sweet, golden fruits perfect for snacking straight off the vine, and they thrive where other tomatoes struggle—even in containers as small as 5 gallons.
My first batch last summer yielded 20 pounds from a single 12-inch pot, proving you don’t need a big yard for big rewards.
The secret lies in their love for warmth and sunlight—at least 6-8 hours daily—and well-draining soil rich in organic matter. Unlike their sprawling cousins, yellow pears grow in tidy bushes (3-4 feet tall), making them ideal for small spaces.
Start seeds indoors 6-8 weeks before your last frost, or grab sturdy seedlings from a nursery. The key? Plant them deep—bury 2/3 of the stem to encourage strong root growth, and space them 18-24 inches apart if growing in the ground.
Water consistently to keep the soil moist but never soggy—these tomatoes hate wet feet—and feed every 2-3 weeks with a balanced fertilizer once flowers appear. Prune suckers (those little shoots between the stem and branches) to focus energy on fruit production.
Within 60-70 days of planting, you’ll be harvesting sun-sweetened pears that taste like summer in every bite, and the plants keep producing until frost.
Watch for blossom end rot (a calcium deficiency) or cracking (from uneven watering), but don’t let these common issues scare you off. A sprinkle of crushed eggshells in the soil and steady watering will keep your harvest blemish-free.
Whether you’re a first-timer or a seasoned gardener, yellow pears are the perfect way to turn even the tiniest corner into a productive, flavor-packed garden.
📚 In This Guide
- What you need
- Instructions
- Tips and common mistakes
- Wrapping up and next steps
What you need
- ● Seeds or Seedlings: Yellow pear tomato seeds (e.g., ‘Yellow Pear’ or ‘Golden Sweet’ varieties) – 2–4 seeds per container or 1 seedling per plant.
- ● Growing Containers or Garden Space: Containers: 5-gallon pots or larger (at least 12–18 inches deep) with drainage holes. 2–3 plants per container (if using large pots).
- ● Garden Plot: Well-draining soil in a sunny spot (6+ hours of sunlight daily).
- ● Potting Mix: High-quality, sterilized organic potting mix (avoid garden soil for containers). 1–2 bags (1–2 cubic feet each).
- ● Fertilizer: Balanced, slow-release fertilizer (e.g., 10-10-10) or compost.
- ○ Optional: Liquid tomato fertilizer (e.g., fish emulsion or seaweed extract) for a mid-season boost.
- ● Basic Tools: Trowel or small shovel
- ● Glove (to protect your hands)
- ● Watering can or hose with a gentle spray nozzle
- ○ Support Structures (Optional but Helpful): Small stakes (18–24 inches tall) or tomato cages (12–18 inches in diameter) for compact varieties.
- ● Twine or plant ties (if using stakes).
- ● Mulch: Straw or shredded leaves (1–2 inches thick) to retain moisture and suppress weeds.
- ○ Pruning Shears: For trimming suckers (optional, but helps manage growth).
- ● Warmth: Yellow pear tomatoes thrive in temperatures between 70–85°F (21–29°C). Start seeds indoors 6–8 weeks before the last frost or transplant seedlings after soil warms.
- ● Sunlight: Full sun (6+ hours daily) is a must—no shade-loving shortcuts here!
- ● Water: Consistent moisture (keep soil evenly damp but not soggy).
- ● Patience: These compact beauties take 60–70 days to fruit from transplanting.
Step-by-step guide for growing yellow pear tomatoes in small spaces
This little gem delivers big flavor—here's how to coax the most from your compact yellow pear plants.
🌱 Step 1: Select the Perfect Container and Soil Mix
Yellow pears thrive in 5-gallon containers with drainage holes—no need for giant plots. I use a mix of 50% high-quality potting soil and 50% compost to give roots room to spread while keeping moisture consistent. The key is loose, airy soil that won't compact around delicate roots.
Fill your pot to about 2 inches below the rim, then water until it's evenly moist but not soggy. Press down gently—just enough to remove air pockets without compacting. These tomatoes grow fast, so a sturdy container prevents tipping as vines fill out.
☀️ Step 2: Choose Location and Provide Support Early
Place your container where it gets 6-8 hours of direct sun daily. A south-facing window works for small pots, but you'll see better production outside. I always add a 4-foot bamboo stake or tomato cage at planting time—yellow pears grow determinate (bush-type) but still need support for fruit weight.
Push the support into the soil beside the plant, then loosely tie the main stem with soft garden twine. Don't wait until vines are heavy—you'll struggle to attach support later. Watch for first flowers around 6-8 weeks after transplanting, which means your plant is ready for regular feeding.
💧 Step 3: Water and Feed for Maximum Fruit Set
Water when the top inch of soil feels dry, but never let the pot sit in saucers of water. Yellow pears hate soggy roots. I use a balanced 10-10-10 fertilizer every 2 weeks once flowers appear, switching to 5-10-10 when fruit starts forming to boost sweetness.
Here's the trick: water deeply in the morning so leaves dry by evening. Wet foliage at night invites disease, and these little tomatoes are prone to early blight. You'll know you're doing it right when new leaves stay a vibrant dark green with no yellowing between veins.
✂️ Step 4: Prune for Airflow and Fruit Quality
Remove any suckers (side shoots) that form in the leaf axils—they drain energy from your fruit. Pinch them off when they're 2 inches long to keep the plant's energy focused on the main stem and fruit clusters. I also trim lower leaves that touch the soil to prevent disease.
When fruit starts coloring, stop fertilizing. The goal now is sweetness, not size. You'll see perfect 1-inch yellow pears forming in clusters—these are the sweetest when they ripen fully on the vine. Harvest when they're uniformly yellow and slightly soft to the touch.
🌿 Step 5: Extend the Season with Simple Care
As temperatures drop below 50°F, move containers to a sheltered spot or bring them indoors near a sunny window. Yellow pears keep producing until frost, but they need consistent warmth to set fruit. I often cover plants with frost cloth on chilly nights to protect flowers.
At season's end, save seeds from your best tomatoes by scooping out the gel, rinsing the seeds, and drying them on a paper towel. These heirloom plants reward you with better flavor each year. With proper care, one plant yields 10-15 pounds of sweet, tangy fruit—enough to share with neighbors!
Tips & tricks for growing compact yellow pear tomatoes
These little tricks will help you maximize your harvest from those space-saving tomato plants.
Container Size Matters: While 5-gallon containers work perfectly, I've found that adding a 2-inch layer of gravel or broken pottery shards at the bottom improves drainage without taking up valuable soil space. This prevents waterlogging while keeping roots happy. The extra drainage also means you can water slightly less frequently, which saves time and reduces the risk of root rot.
Sunlight Strategy: Those 6-8 hours of direct sun are non-negotiable, but here's a pro move: rotate your containers quarter-turn each week to ensure even exposure. I've seen plants develop uneven growth when left in the same position—this simple rotation keeps them balanced and maximizes fruit production. For indoor growers, supplement with a grow light for 12-14 hours daily if natural light is limited.
Fertilizer Timing: The switch from 10-10-10 to 5-10-10 when fruit starts forming is crucial, but here's what nobody tells you—dilute your fertilizer half-strength during the first two feedings after transplanting. This gradual introduction prevents fertilizer burn, which can stress young plants. I also mix in a handful of Epsom salt (about 1 tablespoon per gallon of water) every 4 weeks to boost magnesium levels—these plants love it!
Pruning Precision: When pinching off suckers at 2 inches, use sharp scissors or your fingernails to make a clean cut just above a leaf node. I've seen beginners pull too hard and damage the main stem. Also, save those pruned suckers! Root them in water for a few weeks, then transplant them to their own small pots—you'll get bonus plants without spending a dime.
Pro Tips for Yellow Pear Tomato Plant
- These little tricks will help you maximize your harvest from those space-saving tomato plants.
- Container Size Matters: While 5-gallon containers work perfectly, I've found that adding a 2-inch layer of gravel or broken pottery shards at the bottom improves drainage without taking up valuable soil space.
- Sunlight Strategy: Those 6-8 hours of direct sun are non-negotiable, but here's a pro move: rotate your containers quarter-turn each week to ensure even exposure.
Frequently asked questions
Got questions about growing your own yellow pear tomato plant? You’re not alone! This compact, flavorful variety is a favorite, but it’s natural to have a few uncertainties. Below, we’ve rounded up the most common questions—and answers—to help you grow with confidence.
How much space do yellow pear tomato plants really need?
Yellow pear tomatoes are perfect for small spaces! They thrive in containers as small as 5-gallon pots or even hanging baskets (12+ inches deep). If planting in the ground, space them 18–24 inches apart. Their bushy growth habit means no staking is required—just prune suckers occasionally to keep them tidy.
When is the best time to plant yellow pear tomatoes?
Start seeds indoors 6–8 weeks before your last frost date, or buy transplants from a nursery. For direct sowing, wait until soil temps hit 55–60°F (spring) and nighttime temps stay above 50°F. In warm climates, you can plant in early spring or even fall for a second harvest.
How do I know when yellow pear tomatoes are ripe and ready to pick?
These tomatoes ripen to a bright golden-yellow color, often with a slight blush. They’ll also feel firm but soft to the touch, like a ripe pear! Pick them when fully colored—unlike some varieties, they won’t ripen further off the vine. Pro tip: Harvest in the morning for the best flavor.
What pests or diseases should I watch for with yellow pear tomatoes?
Yellow pears are generally disease-resistant, but watch for aphids, whiteflies, or hornworms (they love these tomatoes too!). Use neem oil or insecticidal soap for pests, and ensure good airflow to prevent fungal issues. If leaves yellow or wilt, check for blight—remove affected foliage immediately.
Can I grow yellow pear tomatoes in containers, and what’s the best setup?
Use a 5-gallon pot or larger with drainage holes, filled with well-draining potting mix. Add a tomato cage or trellis (even if not strictly necessary) to support growth. Place in full sun (6+ hours/day) and water consistently—containers dry out faster than garden beds.
Wrapping up and next steps
Growing a yellow pear tomato plant is a rewarding way to bring flavor and vibrancy to small gardens, balconies, or even containers! 🌱 With its compact size and delicious fruit, this variety proves that big harvests don’t require big spaces—just a little patience and care.
Whether you’re a beginner or a seasoned gardener, the key is to provide the right conditions, from sunlight to soil, and watch your plants flourish.
Now that you’re armed with all the tips and tricks, roll up your sleeves and get planting! Start with healthy seedlings, give them love, and soon you’ll be enjoying homegrown, sun-kissed yellow pears straight from your garden. Happy growing! 🌞