
Pests and Diseases
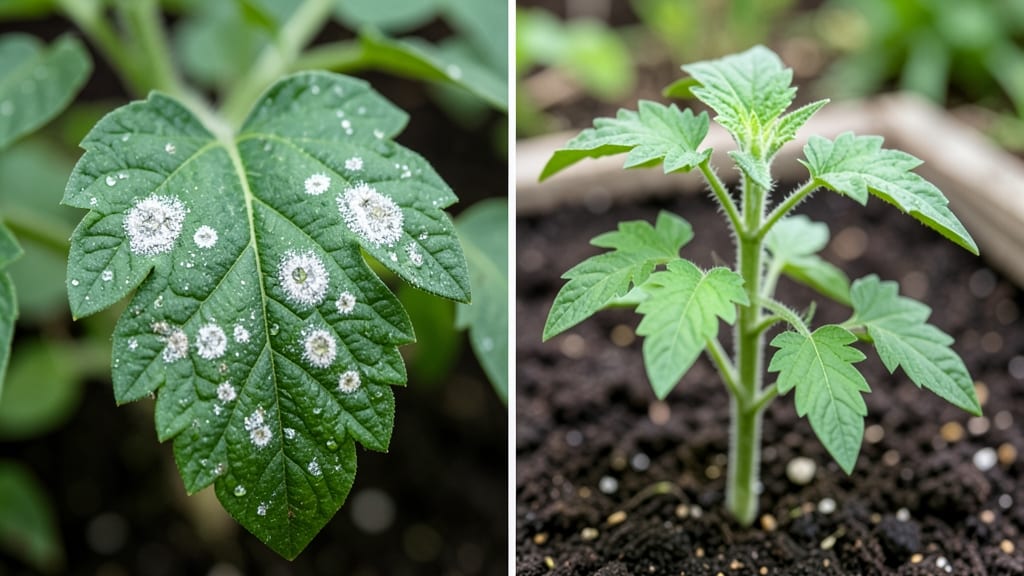
White spots on tomato seedling leaves mean your plants are fighting an invisible battle—one that’s easier to win than you think. 🌱 I’ve nursed back dozens of seedlings from this exact problem, and the fix comes down to three straightforward steps that work even for beginners (yes, including me).
The culprits are usually powdery mildew or early blight, both fungal infections that thrive when seedlings get too wet, crowded, or stressed. You’ll spot them as white, powdery patches on leaves or tiny dark specks that spread like freckles. The good news?
These spots don’t mean your plants are doomed—they just need the right care to bounce back. By the end of these steps, your seedlings will be putting out fresh, spot-free growth within 7-10 days.
The leaves stay crisp, the stems stay strong, and you’ll avoid the heartbreak of losing your whole crop to something that’s actually preventable. Works for greenhouse starts, windowsill seedlings, or outdoor flats—no matter where your tomatoes began their life. Let’s get them growing strong again.
Why it happens
White spots on your tomato seedling leaves can feel like a mystery—one minute your plants look healthy, and the next, they’re covered in puzzling blemishes. But don’t worry! These spots usually stem from a few key culprits, each with its own triggers and solutions.
Let’s break down the science behind why this happens so you can tackle it like a pro.
🌡️ Fungal Infections (Most Common Culprit)
Fungi are the #1 reason for white spots on tomato seedlings, and two troublemakers stand out: Alternaria solani (early blight) and Oidium spp. (powdery mildew). Here’s how they strike:
- High Humidity + Poor Airflow: Fungi thrive in damp, stagnant air. Seedlings packed too closely or in a greenhouse with limited ventilation create the perfect breeding ground. Alternaria loves warm, humid nights (75–85°F), while powdery mildew spreads like wildfire when humidity stays above 70% for days.
- Contaminated Soil or Tools: Fungal spores lurk in old compost, reused containers, or even your pruners. If your seedlings sprouted in soil from last season’s infected plants, spores may already be waiting to pounce.
- Stress from Overwatering: Wet leaves for hours (like from overhead watering) give fungi a direct highway to infect your seedlings. Oidium spores can germinate in just 6 hours of leaf wetness!
💡 Pro Tip: Check the undersides of leaves—if you see fuzzy white growth (powdery mildew) or tiny dark spots with concentric rings (early blight), you’ve got a fungal party crashing your seedlings’ vibe.
🐛 Pests Weakening Defenses
Pests like aphids, spider mites, or whiteflies don’t cause white spots directly, but they create the perfect conditions for them. Here’s how:
- Sap-Sucking Havoc: Aphids and spider mites pierce leaves to drink sap, leaving tiny wounds. These openings let fungal spores slip in like uninvited guests at a buffet.
- Honeydew Mess: Pests excrete sticky honeydew, which attracts sooty mold—a black, crusty fungus that can mask (or worsen) white spots by blocking sunlight and clogging pores.
- Stress = Lower Immunity: Infested seedlings focus energy on fighting pests instead of fending off pathogens. A weakened plant is like an open door for fungi.
🔍 Spot the Signs: Look for curled leaves, webbing (spider mites), or clusters of tiny insects on stems. If your seedlings are also stunted or yellowing, pests might be the hidden instigators.
🌞 Environmental Stress Factors
Sometimes, white spots aren’t from pathogens at all—they’re your seedlings’ way of screaming, “I’m struggling!” Check these environmental red flags:
| Stressor | How It Causes Spots | Quick Fix |
|---|---|---|
| 🔥 Too Much Sun (Sun Scorch) | Intense afternoon rays burn tender leaves, creating white or grayish patches. Common in seedlings moved too soon from shade to full sun. | Gradually acclimate seedlings to sunlight (harden off) over 7–10 days. |
| ❄️ Temperature Swings | Tomatoes hate sudden cold snaps (below 50°F) or heatwaves (above 90°F). Stress weakens cell walls, making leaves prone to fungal attacks or physical damage. | Use row covers for cold or shade cloth for heat. Keep temps between 60–85°F. |
| 💧 Nutrient Deficiencies (Calcium/Magnesium) | White spots can mimic blossom end rot (calcium deficiency) or interveinal chlorosis (magnesium deficiency), but they often appear as crispy or necrotic patches. | Amend soil with crushed eggshells (calcium) or Epsom salt (magnesium). Test soil pH—aim for 6.0–6.8. |
✨ Key Difference: Environmental spots are usually dry, crispy, or appear on older leaves, while fungal spots spread rapidly and may ooze or turn brown.
🧪 Chemical or Water Issues
Believe it or not, your water or gardening products might be the villains. Here’s how:
- Hard Water Buildup: Minerals like calcium and magnesium in hard water can leave white, powdery deposits on leaves—especially in greenhouses or containers. This isn’t harmful but looks like mildew and stresses plants.
- Over-Fertilizing: Too much nitrogen or salt (from synthetic fertilizers) burns leaves, creating white or yellowish patches. Seedlings are extra sensitive!
- Chlorine or Fluoride: Tap water treated with these chemicals can cause leaf tip burn or white spots if used frequently on seedlings.
🚰 Quick Test: Run a finger over the spots. If they feel gritty (like salt) or wipe off easily, it’s likely a mineral buildup. Use filtered or rainwater for seedlings.
Quick Fixes for Tomato Leaf Spots
White spots on your tomato seedlings don’t have to spell disaster—with the right approach, you can nurse those leaves back to health and prevent future outbreaks. Below, we break down targeted solutions for each common cause, from simple home remedies to proactive prevention.
Think of it as a step-by-step troubleshooting guide to save your seedlings before the spots spread!
Fix: Stop the spread and restore leaf health
Step 1: Isolate the Problem 🚫
- Move infected seedlings at least 3 feet away from healthy plants to prevent spores from jumping.
- Remove severely damaged leaves (snip with sterilized scissors) and dispose of them in the trash (not compost).
Step 2: Fungicide Spray (Natural or Store-Bought) 💦
- Baking soda spray: Mix 1 tsp baking soda + 1 tbsp vegetable oil + 1 tsp dish soap + 1 gallon water. Spray both sides of leaves in the morning (avoid direct sun to prevent leaf burn).
- Neem oil: Dilute 1 tbsp neem oil + 1 tsp mild soap + 1 quart water. Spray every 7–10 days for prevention.
- Commercial fungicide: Use copper-based or potassium bicarbonate sprays (like Bonide Copper Fungicide) for stubborn cases.
Step 3: Improve Airflow & Light 🌬️☀️
- Space seedlings 12–18 inches apart to reduce humidity.
- Prune lower leaves touching the soil to prevent spore splash-back during watering.
- Water at the base (not overhead) and early in the day so leaves dry quickly.
Prevention Tips: ✅ Rotate crops: Avoid planting tomatoes in the same spot yearly. ✅ Solarize soil: Cover beds with clear plastic for 4–6 weeks before planting to kill fungal spores. ✅ Use resistant varieties: Try ‘Mountain Merit’ or ‘Defiant PhR’ tomatoes for blight resistance.
Fix: Starve pests and disrupt their life cycle
Step 1: Blast Off Pests 💨
- Spray with water: Use a strong hose stream to knock off aphids/mites from leaves.
- Insecticidal soap: Mix 2.5 tbsp castile soap + 1 quart water. Spray directly on pests (repeat every 5–7 days).
- Neem oil: Same dilution as above—disrupts pest feeding and egg-laying.
Step 2: Introduce Beneficial Insects 🐞
- Release ladybugs, lacewings, or predatory mites (available at garden centers) to eat pests naturally.
Step 3: Remove Debris & Weeds 🪴
- Pests hide in mulch, weeds, and plant debris. Clean up around seedlings weekly.
Prevention Tips: 💡 Sticky traps: Place yellow sticky cards near seedlings to monitor/catch whiteflies. 🌿 Companion plants: Plant basil, marigolds, or nasturtiums nearby to repel pests.
Fix: Adjust care to prevent stress-related spots
Step 1: Check Soil Moisture 🌱
- Stick your finger 1 inch into the soil. Water only if it’s dry—seedlings hate soggy roots!
- Fix compacted soil: Amend with perlite or compost to improve drainage.
Step 2: Repot if Needed 🏺
- If roots are waterlogged, gently repot into a container with well-draining potting mix (add sand or vermiculite).
Step 3: Water Smartly ⏰
- Morning watering (not evening) reduces humidity and fungal risk.
- Use drip irrigation or a watering can with a rose to avoid splashing leaves.
Prevention Tips: 🔥 Pot size matters: Use containers with drainage holes and upgrade pots as seedlings grow. 🌡️ Avoid cold water: Use room-temperature water to prevent shocking roots.
Fix: Shade and hydrate to protect leaves
Step 1: Provide Temporary Shade 🌿
- Use shade cloth (30–50%) or lightweight row covers if temps exceed 90°F (32°C).
- Move seedlings to a partially shaded spot (e.g., under a tree or porch).
Step 2: Mulch to Retain Moisture 🌱
- Apply 2–3 inches of organic mulch (straw or shredded leaves) to keep soil cool and moist.
Step 3: Gradual Hardening Off 🌱
- If seedlings were indoor-started, acclimate them to outdoor conditions slowly (1–2 hours/day, increasing over 7–10 days).
Prevention Tips: ✨ Start seeds late: In hot climates, wait until after the last frost or use slow-release fertilizers to avoid stress. 🎯 Choose heat-tolerant varieties: Try ‘Solar Fire’ or ‘Heatmaster’ tomatoes.
If spots persist despite treatment:
- Trim back to healthy green growth (sterilize tools with rubbing alcohol).
- Fertilize lightly with fish emulsion or compost tea to boost recovery.
- Monitor daily—catch new spots immediately to stop spread.
Pro Tip: 💡 Document progress with photos! Compare “before” and “after” to track what works. Most seedlings bounce back within 1–2 weeks with consistent care.
Frequently asked questions
Are white spots on tomato seedlings always caused by fungus?
Not always! While fungal infections like powdery mildew or early blight are the most common culprits, white spots can also result from environmental stress like sun scorch, mineral buildup from hard water, or even nutrient deficiencies (especially calcium or magnesium). Always check for these before assuming it's a fungal issue.
How can I tell if the white spots are harmful or just mineral deposits?
Run your finger gently over the spots. If they feel gritty or wipe off easily (like salt), it's likely mineral buildup from hard water. Harmful fungal spots usually stay attached to the leaf surface and may appear fuzzy (powdery mildew) or develop dark centers (early blight).
Will pruning leaves with white spots help my seedlings recover?
Yes, but only prune severely affected leaves to prevent the fungus from spreading. Remove leaves by cutting with sterilized scissors (wipe with rubbing alcohol between cuts). Never prune more than 25% of the foliage at once, as this stresses the plant. Always dispose of pruned leaves in the trash, not compost.
How often should I apply neem oil to prevent white spots?
Apply neem oil spray every 7-10 days during active growing seasons (spring through fall) for prevention. Mix 1 tbsp neem oil + 1 tsp mild soap + 1 quart water and spray in the early morning. Avoid applying neem oil when temperatures exceed 90°F (32°C), as it can cause leaf burn.
Can I still transplant seedlings with white spots?
You can, but treat them first with a fungicide spray (like baking soda solution) and isolate them from healthy plants for 7-10 days after transplanting. Choose a spot with good airflow and avoid overhead watering. Monitor daily for new spot development, as transplant shock can make seedlings more susceptible to infections.