
Pests and Diseases
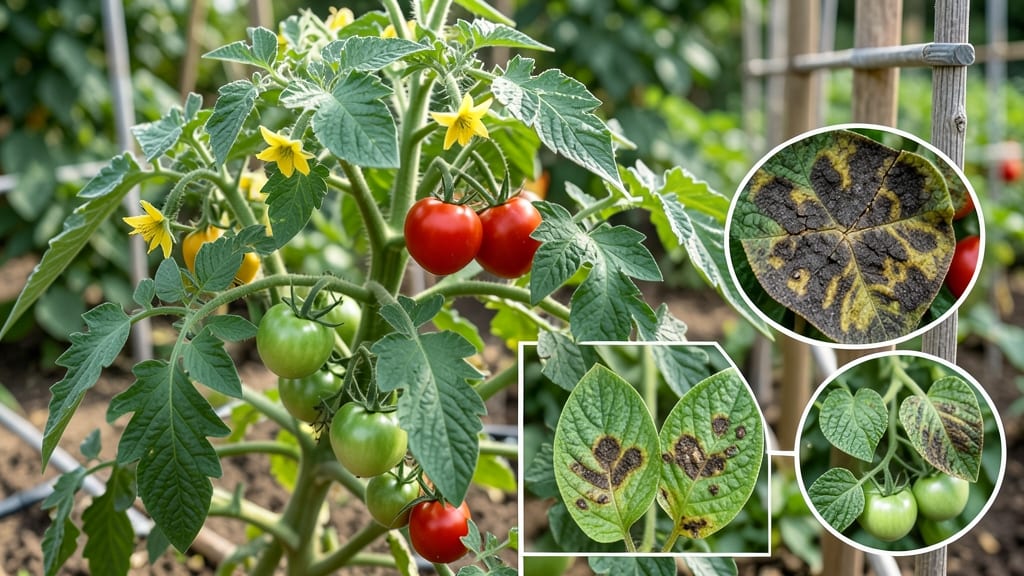
Seeing those unsightly spots on tomato leaves—complete with pictures for reference—is the gardener’s version of a red flag. 🌱 I’ve spent years diagnosing tomato leaf issues, and I’m sharing the exact visual clues to spot common diseases and pests before they ruin your harvest. The good news?
Most tomato leaf spots are treatable—once you know what you’re dealing with. Fungal spots often look like greasy, brown patches, while bacterial spots show up as tiny, water-soaked dots. Nutrient deficiencies can mimic diseases, so I’ll show you how to tell them apart.
By the end, you’ll confidently identify the problem and take action—whether it’s adjusting your watering, applying the right spray, or switching up your growing conditions. Your tomatoes will bounce back stronger than ever. This guide covers the most common issues with clear descriptions and solutions.
Let’s get those leaves healthy again!
Root Causes of Leaf Spots
Tomato leaves developing unsightly spots can be frustrating, but understanding the why behind these blemishes is the first step to saving your plants. 🌱🔍 Whether you’re growing tomatoes in your backyard or a container on your balcony, these spots often stem from a mix of fungal infections, bacterial attacks, environmental stress, or pest damage.
Let’s break down the most common culprits—and why they target your tomatoes like a buffet.
Fungi thrive in moist, humid conditions, and tomato leaves are a prime target. These microscopic organisms don’t just ruin aesthetics—they can weaken your plant, reducing yield and even killing it if left unchecked.
Early Blight: The Classic Ring Spot
- What it is: Caused by the fungus Alternaria solani, early blight starts with small, dark brown or black spots with concentric rings (like a bullseye 🎯).
- Why it spreads:
- Spores survive in soil or plant debris from previous seasons.
- Overhead watering splashes spores onto leaves, creating perfect conditions for infection.
- Poor air circulation (crowded plants, thick foliage) traps moisture, giving fungi a foothold.
- Actionable insight: Early blight loves hot, dry weather followed by sudden rain—a classic setup for outbreaks in late summer.
Late Blight: The Devastating Downpour
- What it is: Caused by Phytophthora infestans, late blight creates greasy-looking, irregular brown spots that spread fast—often within days.
- Why it spreads:
- Cool, wet conditions (50–77°F) are ideal for spore germination.
- Wind and rain carry spores from infected plants (even potatoes!) to your tomatoes.
- Resistant varieties (like 'Mountain Merit' or 'Defiant') are your best defense, but spores can still land on leaves.
- Actionable insight: Late blight is highly contagious—remove infected leaves immediately and avoid working with plants when they’re wet.
Septoria Leaf Spot: The Tiny Targets
- What it is: Septoria lycopersici causes small, circular spots with tiny black dots (fungal fruiting bodies) in the center.
- Why it spreads:
- Long periods of leaf wetness (12+ hours) trigger spore release.
- Older leaves are more susceptible, often starting at the bottom of the plant.
- Poor sanitation (leaving infected debris in the garden) ensures the fungus returns year after year.
- Actionable insight: This fungus overwinters in plant residue, so clean up thoroughly in fall to break the cycle.
Bacteria don’t just cause spots—they clog plant vessels, leading to wilting, oozing lesions, and even plant death. Unlike fungi, bacteria spread via water, tools, or even your hands.
Bacterial Spot: The Pimple-Like Pests
- What it is: Caused by Xanthomonas or Pseudomonas bacteria, this disease creates tiny, water-soaked spots that turn brown with yellow halos.
- Why it spreads:
- Bacterial cells hitchhike on wind, rain, or contaminated pruning tools.
- High humidity (75%+) and warm temps (75–90°F) accelerate outbreaks.
- Splashing water during irrigation or rain disperses bacteria like a fine mist.
- Actionable insight: Sterilize tools with rubbing alcohol between plants, and avoid overhead watering to minimize spread.
Bacterial Speck: The Tiny Terror
- What it is: Similar to bacterial spot but with even smaller, pinpoint lesions (often with a greasy sheen).
- Why it spreads:
- Tomato varieties with poor resistance (like 'Celebrity') are more vulnerable.
- Contaminated seed or soil can introduce bacteria before germination.
- Insects (like aphids) can transfer bacteria from plant to plant.
- Actionable insight: Rotate crops annually and use copper-based sprays as a preventive barrier.
Not all leaf spots are caused by pathogens—sometimes, your tomatoes are just having a bad day due to environmental factors.
Sun Scorch: When Too Much Heat Burns
- What it looks like: White or grayish patches on leaves exposed to direct sun, often with crispy edges.
- Why it happens:
- Intense sunlight + dry conditions cause rapid water loss in leaves.
- Transplant shock (sudden exposure to hot sun after shade) stresses plants.
- Poor watering habits (drought followed by sudden soaking) confuses the plant’s moisture balance.
- Actionable insight: Mulch heavily to retain soil moisture and provide afternoon shade for young plants.
Chemical Burns: The Oops!
Factor - What it looks like: Bleached, necrotic spots (often irregular shapes) where fertilizer or pesticide droplets landed. - Why it happens: - Over-fertilizing (especially with high-salt fertilizers like synthetic nitrogen) damages leaf tissue. - Improper pesticide application (drift or overspray) burns foliage. - Hard water (high in minerals) can leave residue that blocks stomata (leaf pores). - Actionable insight: Always water plants before fertilizing to dilute salts, and use a drop cloth when spraying to avoid drift.
Hail or Physical Damage: Nature’s Bruises
- What it looks like: Ragged, torn spots with no clear pattern, often on upper leaves.
- Why it happens:
- Hailstorms puncture leaves, creating entry points for pathogens.
- Strong winds can tear foliage, leaving wounds that invite infection.
- Poor pruning (snagging leaves with tools) creates unnecessary stress.
- Actionable insight: Protect plants with row covers during hail forecasts and prune carefully with sharp, clean shears.
Some "spots" aren’t from diseases at all—they’re pest calling cards left behind by hungry insects.
Aphids: The Sap-Sucking Spots
- What it looks like: Sticky residue (honeydew) + yellowing, curled leaves with tiny black spots (sooty mold from honeydew).
- Why it happens:
- Aphids pierce leaves to feed, injecting toxins that cause chlorotic (yellow) spots.
- Ants "farm" aphids, protecting them in exchange for honeydew—leading to worse infestations.
- Actionable insight: Blast aphids off with water or introduce ladybugs (their natural predator).
Spider Mites: The Tiny Web Weavers
- What it looks like: Fine webbing + stippled, white/yellow spots (like pepper on leaves).
- Why it happens:
- Drought stress weakens plants, making them more susceptible to mites.
- Dry, hot conditions (low humidity) allow mites to thrive unchecked.
- Actionable insight: Mist plants regularly to boost humidity and use neem oil as a deterrent.
Flea Beetles: The Pockmarked Pests
- What it looks like: Tiny, shot-hole-like spots (like a BB gun blast 🔫).
- Why it happens:
- Adult flea beetles chew leaves, leaving behind irregular, skeletal holes.
- They love young, tender seedlings, often devouring entire leaves overnight.
- Actionable insight: Cover seedlings with floating row covers until plants are established.
Key Takeaway: Most leaf spots are preventable with proper sanitation, watering techniques, and variety selection. The moment you spot trouble, act fast—whether that means pruning infected leaves, adjusting your watering routine, or introducing beneficial insects.
Your tomatoes will thank you with juicy, blemish-free fruits come harvest time! 🍅✨
Fixing Tomato Leaf Spots Fast
Spotting strange marks on your tomato leaves? Don’t panic—most issues are fixable with the right approach! Below, we’ve mapped out practical, step-by-step solutions for the most common causes, from fungal infections to pest damage. Follow these fixes, and your plants will be back to thriving in no time.
Fungal spots (like early blight, late blight, or septoria leaf spot) thrive in damp conditions. Act fast to prevent them from ruining your harvest!
🔥 Remove Infected Leaves Immediately
- How: Snip off yellow or spotted leaves with clean scissors or pruners.
Avoid tearing leaves—this spreads spores. - Pro Tip: 💡 Drop infected leaves into a sealed bag (not your compost pile) to prevent reinfection. - When: Do this early in the morning when humidity is lower, reducing spore dispersal.
🍳 Spray with Copper or Fungicide (Organic or Chemical)
- For Organic Growers:
- Baking Soda Spray: Mix 1 tbsp baking soda + 1 tbsp vegetable oil + 1 tsp dish soap + 1 gallon water.
Spray every 7–10 days (especially after rain). - Neem Oil: Apply 2–3 times weekly (follow label instructions). Neem disrupts fungal growth and deters pests. - For Chemical Solutions: - Use copper fungicide (like Copper Sulfate) or chlorothalonil (e.g., Daconil).
Follow package rates—overuse can harm plants. - When: Apply at dawn or dusk to avoid burning leaves in sunlight.
🌡️ Improve Airflow & Reduce Moisture
- Prune Overcrowded Plants: 🌿 Trim branches to allow sunlight and air to circulate. Aim for 12–18 inches between plants.
- Water at the Base: Avoid wetting leaves—water in the morning so foliage dries by evening.
- Mulch Properly: Use straw or grass clippings (not thick layers) to keep soil moist without trapping humidity.
Pests like aphids, spider mites, and whiteflies leave behind sticky residue or tiny holes. Here’s how to evict them!
👨🍳 Blast Off Pests with Soap or Oil Sprays
- Insecticidal Soap: Mix 2.5 tbsp mild castile soap + 1 quart water.
Spray directly on pests (avoid flowers if bees are around). - Horticultural Oil: Apply early in the season (before pests appear) or when you spot them. Reapply every 5–7 days. - DIY Garlic Spray: Blend 1 garlic bulb + 1 tsp cayenne pepper + 1 quart water.
Strain and spray—pests hate the smell!
🕷️ Introduce Beneficial Predators
- Ladybugs: Release 50–100 per plant to eat aphids and mites.
- Lacewings: Their larvae devour spider mites and whiteflies. Buy eggs or adults online.
- Nematodes (for Soil Pests): Apply beneficial nematodes (like Steinernema feltiae) to target root-feeding pests.
🎯 Prevent Future Infestations
- Yellow Sticky Traps: Hang near plants to catch flying pests like whiteflies.
- Reflective Mulch: Use silver plastic mulch—it confuses pests and deters them from landing.
- Rotate Crops: 🌱 Don’t plant tomatoes in the same spot yearly—this breaks pest life cycles.
Sometimes, spots appear due to stress from heat, sun, or nutrient issues. Adjust these factors to help recovery.
🔪 Adjust Watering & Sunlight
- Overwatering? Let soil dry 1–2 inches deep between waterings. Yellow spots? Could be overwatering or nutrient burn.
- Sunburn Spots? If leaves look bleached or crispy, provide light shade (especially in 11 AM–3 PM heat).
💪 Boost Plant Health with Fertilizer
- Balanced Fertilizer: Use a 10-10-10 or 5-5-5 formula to prevent nitrogen deficiency (which weakens plants).
- Epsom Salt Soak: Mix 1 tbsp Epsom salt per gallon of water and apply weekly for magnesium deficiency (shows as yellow between veins).
- Compost Tea: Brew compost tea (steep compost in water for 24 hours, strain) to strengthen roots and immunity.
Once your tomatoes are healthy, lock in those gains with these habits:
- 🌡️ Monitor Humidity: Use a hygrometer—keep levels below 60% to deter fungi.
- ✨ Companion Planting: Grow basil, marigolds, or onions near tomatoes—they repel pests naturally.
- 🔄 Crop Rotation: Switch tomato family plants (peppers, eggplants) every 3 years to prevent soil-borne diseases.
- 🧼 Sterilize Tools: Wipe pruners and pots with rubbing alcohol between uses to avoid spreading pathogens.
Remember: The key is early action! Check your plants weekly, especially after rain or heatwaves. With these fixes, your tomato leaves will stay spot-free, and you’ll be feasting on juicy, disease-resistant tomatoes in no time! 🍅🌟
Frequently asked questions
What do the different colored spots on tomato leaves mean?
Brown spots with rings usually indicate early blight fungus, while greasy-looking brown patches suggest late blight. Tiny black dots in circular spots mean septoria leaf spot. Yellow halos around small brown spots signal bacterial infections. White or grayish patches often mean sun scorch or powdery mildew.
Can I still harvest tomatoes if the leaves have spots?
Yes, but only if the spots are on lower leaves and haven't reached the fruit. Remove infected lower leaves to redirect energy to production. If spots appear on upper leaves or stems, remove the entire plant to prevent spreading. Always wash tomatoes thoroughly before eating.
How do I tell if my tomato spots are from disease or pests?
Disease spots often have distinct patterns (rings, halos, or black dots) and spread gradually. Pest damage shows as random holes, webbing, or sticky residue. Check the undersides of leaves for tiny insects or eggs—if you see those, it's likely pests.
Will copper spray work on all types of tomato leaf spots?
Copper spray is effective against fungal diseases (early blight, late blight) but won't help with bacterial spots or pest damage. For bacteria, use copper-based fungicides or bacterial-specific sprays. Always follow label instructions for best results.
How often should I check my tomato plants for spots?
Inspect your plants every 3-5 days during growing season, especially after rain or when humidity rises. Early detection gives you the best chance to stop spot diseases before they spread. Keep a small notebook to track when spots appear and what conditions might have caused them.