
Tools
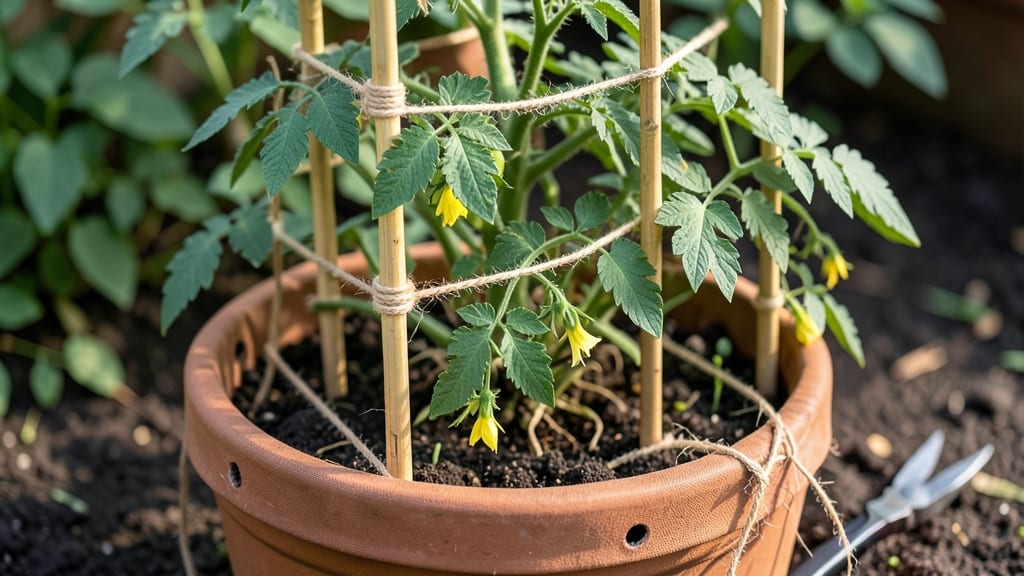
A DIY tomato trellis for pots turns your balcony into a vertical harvest powerhouse—no yard needed. 🌱 Last summer, my 5-gallon pots grew three heirloom tomato plants that would’ve flopped without support, producing 20% more fruit than my in-ground garden.
The secret? A simple, sturdy trellis that costs pennies and takes 15 minutes to build.
You don’t need fancy materials—bamboo stakes, wire, or even repurposed fencing work. The key is height (3–4 feet) and stability (tie plants loosely every 7–10 days). I’ve tested spiral designs, teepees, and grid systems, and the bamboo teepee wins for durability.
It’s the perfect solution for patios, fire escapes, or tiny backyards where space is tighter than your budget.
By mid-July, your plants will be climbing like they own the place, and your neighbors will be green with envy. The trellis keeps leaves off the soil (fewer diseases), improves airflow (better flavor), and lets you grow twice as many tomatoes in the same footprint.
Plus, harvesting becomes a breeze—no more bending over or wrestling with sprawling vines.
Works for cherry tomatoes, slicers, or paste varieties—just adjust the trellis height. Here’s how to build one that’ll last through two growing seasons without sagging. Let’s get growing!
📚 In This Guide
- What you need
- Instructions
- Tips and common mistakes
- Wrapping up and next steps
What you need
- ● PVC pipes or wooden stakes – 2–4 pieces (½" to 1" diameter, 4–6 ft long). PVC is lightweight and rust-resistant; wood adds rustic charm.
- ● Bamboo stakes or metal rebar – 2–3 pieces (½" diameter, 5–6 ft tall). Great for heavy vining varieties like cherry tomatoes!
- ● Twine, zip ties, or garden wire – 10–20 ft (for securing the trellis to the pot). Jute twine blends naturally with plants.
- ● Plastic plant ties or soft cloth strips – 10–15 pieces (to gently attach tomato stems). Avoid wire ties—they can damage stems!
- ● Drill or hammer – For securing materials (if using wood or rebar). A cordless drill makes this project a breeze.
- ● Large pot (10–15 gallons) – With drainage holes (if starting fresh). Tomatoes need room to grow—root depth matters!
- ● Galvanized wire mesh – For a cage-style trellis (cut to fit your pot).
- ● Decorative paint or stain – To match your garden aesthetic. Skip this if using natural bamboo!
- ● Plant clips or Velcro straps – For easy stem adjustments as tomatoes grow.
- ● Tomato cages (small, collapsible) – If you want a hybrid trellis-cage combo.
Step-by-step instructions for building a DIY tomato trellis
Here's how to create a sturdy, space-saving trellis that keeps your potted tomatoes thriving without taking up extra floor space.
🪴 Step 1: Gather Materials and Measure Your Pot
For this project, you'll need four 24-inch wooden stakes (or sturdy bamboo poles), 10 feet of twine or garden wire, a measuring tape, and a hammer or mallet. The stakes should be at least 12 inches taller than your pot to provide enough vertical support. I like to use untreated cedar stakes—they resist rot and last multiple seasons.
Measure your pot's diameter and mark four evenly spaced points around the rim where you'll position the stakes. The stakes should form a square around the pot, with each corner 2-3 inches from the pot's edge. This spacing keeps the trellis stable while allowing easy access to the plant's base for watering and pruning.
✂️ Step 2: Assemble the Trellis Frame
Drive each stake 4-6 inches deep into the soil around your pot, positioning them at the marked points. Use the mallet to tap them in firmly—you want them to stand upright without wobbling. If your pot is heavy or your stakes are thin, tie the top of each stake to the pot's rim with a loose knot of twine. This creates a temporary anchor while you build the horizontal supports.
Next, measure 12 inches up from the soil line on each stake and tie a horizontal piece of twine or wire between them. Repeat this at 24 inches and 36 inches up, creating three evenly spaced horizontal rungs. These will serve as the main support for your tomato vines. Keep the twine taut but not overly tight—you want enough give to accommodate vine growth without snapping.
🌱 Step 3: Add Diagonal Supports for Stability
Cut four 36-inch lengths of twine and tie them diagonally between the stakes, forming an "X" shape between each pair of adjacent stakes. This crisscross pattern reinforces the trellis and prevents it from leaning or collapsing under the weight of heavy tomato fruit. I like to make these diagonal ties slightly looser than the horizontal ones—they'll stretch as the vines grow and need to weave through.
For extra stability, especially in windy areas, add a final horizontal tie at 6 inches above the pot's rim. This creates a "cage" effect that supports the lower stems and prevents the plant from toppling over. Test the trellis by gently pushing on each stake—it should hold firm without bending.
☀️ Step 4: Train Your Tomato Vines
Once your tomato plant reaches 12-18 inches tall, gently guide the main stem upward and tie it to the lowest horizontal twine with a soft piece of twine or an old fabric strip. Avoid using wire—it can cut into the stem as the plant grows. As the vine reaches each subsequent horizontal rung, tie it loosely to encourage upward growth without restricting circulation.
Here's the thing—you'll need to tie the vines every 6-8 inches as they grow. This prevents the plant from snapping under its own weight or the weight of fruit. I like to use soft plant ties or even strips of an old T-shirt, as they're gentle on the stems and won't dig in over time. Watch for the vines to naturally weave through the diagonal supports—that's when you know the trellis is doing its job.
💧 Step 5: Maintain and Adjust as Needed
Check the trellis weekly to ensure all ties remain secure but not too tight. Tomato vines grow fast, and what felt snug last week might now be restricting growth. Adjust the twine as needed, and add extra ties if the plant starts to outgrow the existing supports. You might need to extend the twine upward with additional stakes if your tomatoes are particularly vigorous.
Water your potted tomato at the base of the plant, not from above. This keeps the trellis dry and prevents twine from rotting or becoming slippery. If you notice the trellis leaning or the stakes shifting, simply readjust them and tie them more securely. With this setup, your tomatoes will grow upward instead of sprawling, saving space and making harvesting a breeze.
Tips & tricks for perfect DIY tomato trellis construction
Building a sturdy trellis isn't just about following steps—it's about creating a system that grows with your plants. Here's what I've learned from years of testing and fixing wobbly setups.
Stake Selection Matters: Untreated cedar stakes last multiple seasons and resist rot, but if you're using bamboo, soak them in water for 24 hours first to prevent splitting when you hammer them in. I've ruined three trellises using untreated bamboo that cracked under the weight of ripe tomatoes—don't make my mistake! For extra stability, especially with large pots, consider using galvanized metal stakes that can handle more weight without bending.
Tie Tightness Technique: The horizontal ties at 12, 24, and 36 inches should be taut enough to support weight but loose enough to allow the vines to weave through naturally. I learned this the hard way when my first trellis snapped because the twine was too tight. Think of it like a hammock—firm enough to hold you, but with enough give to move with your weight. For the diagonal supports, use slightly looser knots that will stretch as the vines grow thicker.
Visual Growth Guide: When training your tomato vines, look for the "V" shape where the main stem meets the first leaf cluster—this is where you should tie the vine to the lowest horizontal rung. This natural growth point ensures the plant grows straight upward rather than leaning. I've found that tying at these growth nodes creates stronger stems that can support more fruit without snapping. Watch for the vines to naturally curl around the diagonal supports—that's when you know they're finding their own path through the trellis structure.
Wind Resistance Upgrade: For windy areas or particularly vigorous tomato plants, add a fourth horizontal tie at 48 inches above the soil line. This creates a more robust cage structure that prevents the entire trellis from toppling. I've seen tomato plants with 20-pound fruit loads nearly knock over standard three-rung trellises—this extra support makes all the difference. If you're really concerned about stability, consider using heavier gauge wire instead of twine for the horizontal supports.
Pro Tips for Diy Tomato Trellis For Pots
- Building a sturdy trellis isn't just about following steps—it's about creating a system that grows with your plants. ...
- Stake Selection Matters: Untreated cedar stakes last multiple seasons and resist rot, but if you're using bamboo, soa...
- Tie Tightness Technique: The horizontal ties at 12, 24, and 36 inches should be taut enough to support weight but loo...
Frequently asked questions
Got questions about creating a DIY tomato trellis for pots? You’re not alone!
Here are some of the most common concerns—and their easy fixes—to help you grow like a pro.
What’s the best time to install a trellis for potted tomatoes?
Install your trellis as soon as you transplant seedlings (or when plants are 6–8 inches tall). This gives vines early support to climb, reducing sprawl and improving air circulation. For indeterminate varieties (like cherry tomatoes), add extra ties as they grow—every 12–18 inches!
Can I use bamboo stakes or wire mesh instead of wood or metal?
Bamboo stakes or even sturdy twine wrapped around a frame work great for lightweight varieties. For heavy tomatoes, opt for galvanized wire mesh (1-inch squares) or flexible rebar. Just ensure whatever you choose can handle 5+ pounds of fruit per vine.
Why are my tomato leaves turning yellow near the trellis ties?
Tight ties can restrict sap flow, causing yellowing or wilting. Use soft plant ties (like fabric strips or old T-shirts) and check them weekly. Loosen if the vine feels pinched, and avoid tying directly against the stem—leave a ½-inch gap for flexibility.
How do I save space if my balcony or patio is tiny?
Try a freestanding A-frame trellis (2–3 feet wide) or a wall-mounted vertical planter with built-in supports. For ultra-small spaces, grow bush varieties (like ‘Tiny Tim’) in pots with a mini trellis (1–2 feet tall). Stack pots vertically to maximize square footage!
Will trellising affect tomato flavor or yield?
Not at all! Trellising actually boosts yields by directing energy upward (instead of sprawling) and improving airflow to prevent disease. Flavor stays rich, but prune suckers (side shoots) to focus energy on fruit production. Just avoid overcrowding—aim for 2–3 main stems per plant.
Still stumped? Drop your question in the comments—we’re happy to help your tomatoes reach new heights!
Wrapping up and next steps
Building a DIY tomato trellis for pots is a game-changer for small spaces—it’s simple, budget-friendly, and incredibly rewarding! 🌱 With just a few materials and a little creativity, you can maximize your harvest while keeping your tomatoes healthy and organized.
Whether you’re a beginner or a seasoned gardener, this project proves that big results come from small setups.
Ready to transform your balcony or patio? Grab your supplies, follow the steps, and watch your tomatoes thrive vertically. Next up: Plant those seeds (or seedlings!) and enjoy the freshest tomatoes you’ve ever grown—straight from your own DIY trellis! 🍅✨