
Diseases
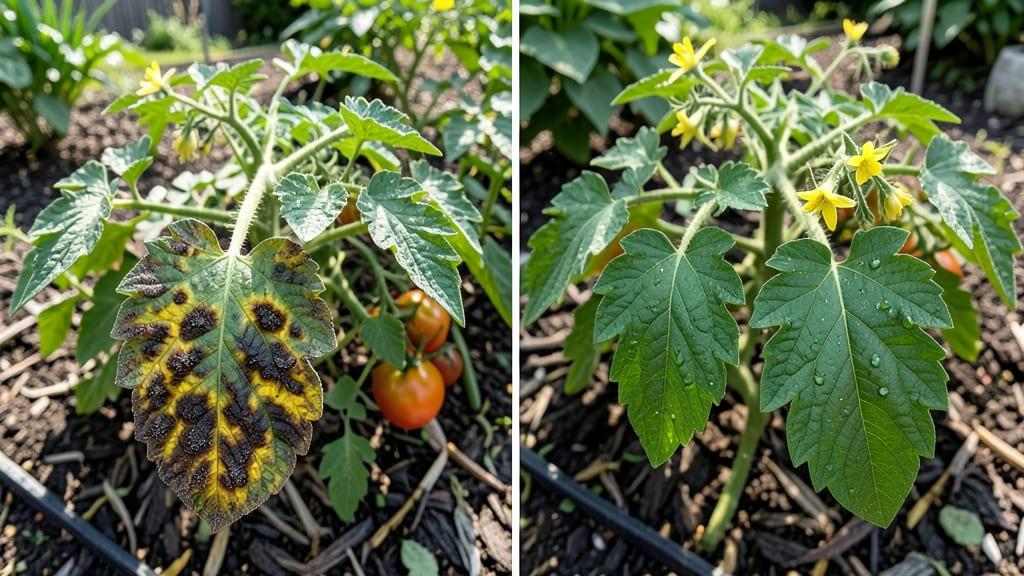
Brown spots on tomato leaves can turn your lush plants into a sad, spotted mess—unless you act fast. 🌱 I’ve battled this exact problem in my garden, and the right pruning and spray combo saved my harvest.
The key is identifying whether it’s early blight, late blight, or something else entirely, because each needs a slightly different fix.
Most brown spots start as tiny freckles on lower leaves, then spread upward if ignored. Early blight loves warm, humid weather and thrives on old leaves, while late blight (the aggressive cousin) spreads faster and can ruin a plant in days.
The good news? Both respond to pruning, copper sprays, and a little preventive care—no expensive chemicals needed unless it’s a full-blown outbreak.
Within 10-14 days of pruning infected leaves and applying a homemade spray (like neem oil or baking soda mix), you’ll see new growth pushing through. The plants stop wasting energy on damaged foliage and redirect it to fruit production, giving you bigger, healthier tomatoes by harvest time.
This method works for backyard gardens, containers, and even greenhouses—just adjust the spray frequency based on how fast the spots spread. The goal isn’t perfection; it’s saving your plants before the disease wins. Let’s get those leaves back to vibrant green.
Root Causes Behind Leaf Spots
When you spot those unsightly brown patches marring your tomato leaves, it’s rarely a random act of nature—it’s a plant’s distress signal. Understanding the why behind these symptoms is the first step to saving your crop.
Below, we break down the most common culprits, from microscopic invaders to environmental stressors, with the science-backed details you need to diagnose the issue accurately.
Fungi are the #1 cause of brown spots on tomato leaves, thriving in warm, humid conditions. These pathogens don’t just discolor leaves—they weaken the plant’s ability to photosynthesize, stunting growth and reducing fruit yield.
🔬 Early Blight (Alternaria solani)
- How it spreads: Spores land on lower leaves, especially in crowded or poorly ventilated gardens. Splashes from watering or rain carry them upward.
- Science behind the damage: The fungus produces toxins that trigger necrotic (dead) tissue in concentric rings. Look for:
- Target-like spots with tan centers and dark borders.
- Spots that crust over and may crack as they age.
- Why it’s worse at night: High humidity (above 75%) at night creates the perfect breeding ground for spores.
🍅 Late Blight (Phytophthora infestans)
- The “plant killer”: This aggressive fungus is infamous for devastating crops (remember the Irish Potato Famine?). It thrives in cool, wet conditions (50–77°F) and can spread rapidly in 48 hours.
- Key identifiers:
- Oily, dark green to purple-brown spots that spread quickly, often with a white, fuzzy mold on the undersides of leaves.
- Affects stems and fruit, causing rot and collapse.
- Why it’s tricky: It can survive in soil or infected plant debris for years, waiting for the right conditions to strike.
🌡️ Septoria Leaf Spot (Septoria lycopersici)
- The slow burner: This fungus favors warm, humid weather (70–85°F) and often appears later in the season.
- What to watch for:
- Small, circular spots (1/8–1/4 inch) with gray centers and dark borders.
- Tiny black specks (pycnidia) in the center of spots—these are the fungus’s spore factories.
- Why it’s persistent: Spores can hitchhike on wind, water, or even garden tools, reinfecting plants season after season.
Not all brown spots are caused by pathogens—sometimes, your tomatoes are reacting to their surroundings. These issues are often secondary, meaning they weaken the plant, making it more susceptible to fungal attacks.
☀️ Sun Scorch (Physiological Damage)
- The culprit: Intense sunlight + heat + low water = stressed leaves.
- How it looks:
- Dry, papery brown spots on leaf edges or between veins, often on exposed, upper leaves.
- Unlike fungal spots, these don’t spread and may appear crispy to the touch.
- Why it happens: When tomatoes can’t transpire (release water) fast enough, cells overheat and die. Common in afternoon sun or after sudden heatwaves.
💧 Overwatering or Poor Drainage
- The problem: Waterlogged soil cuts off oxygen to roots, leading to:
- Yellowing leaves (chlorosis) followed by brown, mushy spots as cells die from lack of nutrients.
- Root rot, which can spread to leaves via the plant’s vascular system.
- Key sign: Spots often appear on lower leaves first and may smell rank or sour.
🌪️ Physical Damage (Hail, Wind, or Tools)
- The damage: Ragged, irregular brown patches with no defined edges, often accompanied by:
- Torn or shredded leaf tissue.
- No fungal growth (unlike blight, which leaves a fuzzy residue).
- Why it matters: Open wounds create entry points for fungi and bacteria, turning a mechanical injury into a full-blown infection.
Pests don’t always cause brown spots directly, but their feeding can stress plants or create wounds that invite fungal infections.
🐛 Aphids, Spider Mites, and Whiteflies
- How they contribute:
- Piercing-sucking mouthparts remove plant sap, weakening leaves and leaving them vulnerable to sooty mold (a black, powdery fungus that thrives on their honeydew).
- Yellowing between veins followed by brown, crispy edges as the plant declines.
- Tell-tale signs:
- Sticky residue on leaves (honeydew).
- Fine webbing (spider mites) or white, waxy insects (aphids).
🐛 Hornworms and Slugs
- Direct damage:**
- Large, irregular holes or slime trails (slugs) that leave behind brown, chewed edges.
- Hornworms can devour entire leaves overnight, leaving only the veins.
💡 Pro Tip: Before reaching for fungicides, check the undersides of leaves for signs of pests or fungal growth. A magnifying glass can help spot early pycnidia (black specks) or spider mite webbing that’s invisible to the naked eye.
Fixing Leaf Spots Naturally
Now that you’ve identified the culprit behind those unsightly brown spots on your tomato leaves, it’s time to take action! The good news? Most causes have simple, effective fixes—no fancy tools or expensive chemicals required.
Below, we’ve mapped out practical solutions for each common cause, along with prevention tips to keep your tomato plants thriving.
Fix it fast with these steps:
- 🔥 Remove Infected Leaves Immediately
- Snip off any leaves with brown spots (especially the lower ones) using sterilized pruners or scissors. Dispose of them in the trash—not the compost—to prevent spreading spores.
- Pro tip: 💡 Wipe your pruners with rubbing alcohol between cuts to avoid cross-contamination.
- 🌿 Improve Air Circulation
- Fungal spores love humidity and stagnant air. Space your tomato plants 18–24 inches apart and prune suckers (those little shoots between the stem and branches) to encourage airflow.
- If growing in containers, ensure pots have drainage holes and avoid overcrowding.
- 💦 Water at the Right Time
- Never water the leaves—always direct water to the soil at the base. Use a soaker hose or drip irrigation to keep foliage dry.
- Water early in the morning so leaves have time to dry before evening humidity sets in.
- 🌱 Boost Plant Immunity - Neem oil spray (1 tsp neem oil + 1 tsp mild soap + 1 quart water) acts as a natural fungicide.
Spray every 7–10 days until the problem clears. - Baking soda spray (1 tbsp baking soda + 1 tsp oil + 1 gallon water) can also help. Test on a few leaves first to avoid burning.
- 🌡️ Adjust Growing Conditions
- Fungal diseases thrive in warm, wet conditions. If possible, move pots to a sunnier, drier spot or use a shade cloth during peak humidity.
Cool things down with these tricks:
- 🌳 Provide Afternoon Shade
- If your tomatoes are getting too much direct sun, especially in hot climates, use a light shade cloth (30–50%) during the hottest hours (11 AM–3 PM).
- Pro tip: 🌡️ Mulch around the base with straw or grass clippings to keep roots cool.
- 💧 Hydrate Deeply and Often
- Water slowly and deeply (1–1.5 inches per week) to prevent shallow roots from drying out. Use drip irrigation for consistency.
- Avoid wetting leaves, as this can worsen heat stress by increasing evaporation.
- 🌿 Prune for Better Airflow
- Overly dense foliage traps heat. Prune inner leaves to improve airflow and reduce heat buildup.
Kick pests to the curb with these methods:
- 🔍 Inspect and Isolate
- Check the undersides of leaves for tiny webs (spider mites) or sticky residue (aphids). Isolate affected plants if possible.
- 🚿 Blast Them Off
- Strong spray of water (from a hose) can dislodge many pests. Do this early in the day so leaves dry quickly.
- 🌿 Introduce Beneficial Insects
- Ladybugs, lacewings, or predatory mites eat aphids and spider mites naturally. Buy them online or attract them with neem oil sprays.
- 🍋 Homemade Pest Repellent
- Mix 1 tbsp dish soap + 1 tbsp vegetable oil + 1 quart water and spray directly on pests. Repeat every 3–4 days.
Fix deficiencies with targeted care:
- 📊 Test Your Soil - Use a DIY soil test kit (available at garden centers) to confirm which nutrient is lacking.
Common deficiencies: - Calcium (Blossom End Rot): Add crushed eggshells or calcium nitrate to the soil. - Magnesium (Yellowing between veins): Sprinkle Epsom salt (magnesium sulfate) around the base (1 tbsp per plant). - Iron (Yellowing new leaves): Apply chelated iron or use iron sulfate per package instructions.
- 💧 Water with Nutrient Boosts
- For a quick fix, mix 1 tbsp Epsom salt in a gallon of water and water the soil (not leaves). Repeat weekly if needed.
Once your tomatoes are back on track, keep these habits to avoid future spots:
- 🌱 Rotate crops—don’t plant tomatoes in the same spot year after year.
- 🌿 Clean up debris at the end of the season to remove fungal spores.
- 🍅 Choose resistant varieties like ‘Mountain Merit’ or ‘Defiant PhR’ for blight-prone areas.
- 🌡️ Monitor weather forecasts—if rain is predicted, take preventive sprays (neem oil or copper fungicide) as a shield.
Final Thought: 🎯 Most brown spots are fixable with quick action and a little TLC. Start with removal + better airflow, then adjust watering and nutrients. Your tomato plants will bounce back—and you’ll be rewarded with juicy, healthy fruits in no time!
Frequently asked questions
Can I still harvest tomatoes if the leaves have brown spots?
Yes, but focus on healthy leaves first. Tomatoes produce fruit from the top of the plant, so if the lower leaves are infected, prune them immediately and let the plant redirect energy to fruit production. Avoid harvesting tomatoes from branches with severe fungal growth—these may carry spores. Always wash tomatoes thoroughly before eating.
How do I tell if brown spots are from blight or just sun damage?
Check the pattern and location of the spots. Sun damage appears as dry, crispy patches on upper leaves exposed to direct afternoon sun, while blight spots are concentric rings (early blight) or oily, spreading patches (late blight). Blight also shows up on lower leaves first and may have fuzzy mold underneath.
Will copper fungicide work on all types of brown spots?
Copper fungicide is most effective against fungal diseases like early/late blight and Septoria, but it won’t help with sun scorch, nutrient deficiencies, or pest damage. For sun damage, provide afternoon shade. For pests, use insecticidal soap. Always rotate treatments to prevent resistance—apply copper every 7-10 days during outbreaks.
How long does it take to see improvement after treating brown spots?
With proper care, you should see new growth within 7-14 days. Remove all infected leaves immediately, improve airflow, and apply preventative sprays (like neem oil). If spots continue spreading after 2 weeks, you may need stronger fungicides or resistant tomato varieties for next season.
Can I save my tomato plant if most leaves are brown and crispy?
It depends on the cause. If it’s late blight or severe fungal infection, the plant may not recover—remove it completely to prevent spread. However, if it’s sun scorch or nutrient deficiency, prune damaged leaves, adjust care, and the plant can often bounce back. Focus on healthy stems and new growth—these will produce fruit.