
Tools
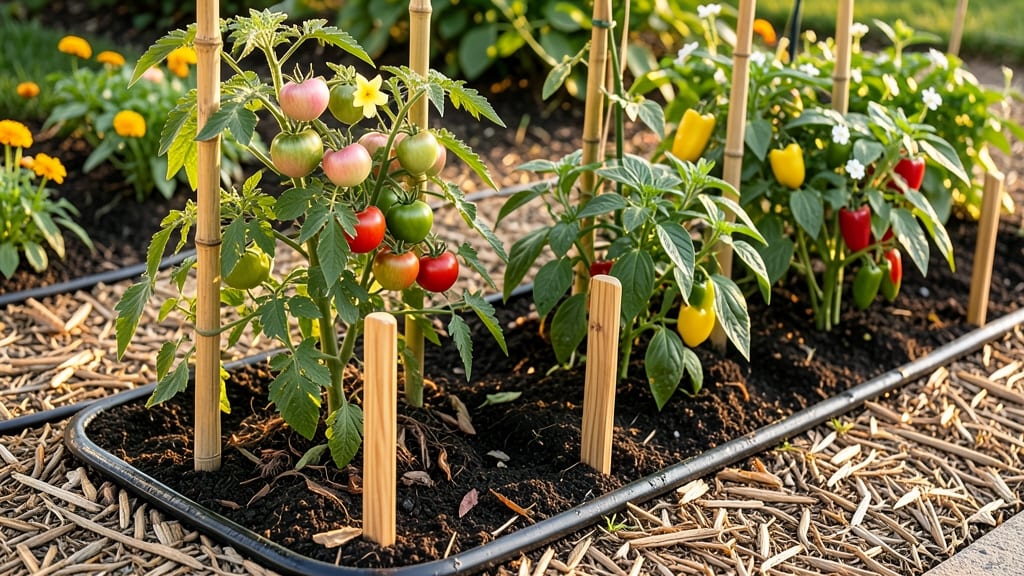
Your tomato and pepper garden layout can double production when you arrange plants by sunlight needs and companion benefits. ✨ I learned the hard way—crowding plants for aesthetics meant stunted growth and fewer peppers, until I mapped out zones based on sun exposure and companion pairings instead of just looks.
Start with 6+ hours of direct sun for tomatoes and 8+ hours for peppers. Place tall indeterminate tomatoes on the north side of raised beds to avoid shading shorter plants.
My pepper plants now thrive next to basil and onions, while tomatoes get a boost from marigolds and nasturtiums planted between rows. By mid-summer, you’ll see tomatoes ripening while peppers stay productive—no more competition for light or nutrients.
The layout also makes weeding and harvesting easier, with clear paths between rows. My first attempt had plants fighting for space; this system turns chaos into a high-yielding, low-stress harvest. Works for in-ground plots, raised beds, or even large containers.
The key is spacing (18-24 inches between tomatoes, 12-18 inches for peppers) and rotating crops yearly to prevent disease buildup.
📚 In This Guide
- What you need
- Instructions
- Tips and common mistakes
- Wrapping up and next steps
What you need
- ● Soil: 5-10 bags of high-quality garden soil or potting mix (depending on garden size; aim for 2-3 cubic feet per plant). Look for a blend with 60-70% organic matter.
- ● Compost: 2-3 bags of well-aged compost (1 part compost to 3 parts soil for optimal nutrition).
- ● Tomato & Pepper Plants: 6-10 tomato seedlings (determinate or indeterminate, based on your layout goals).
- ● 4-8 pepper seedlings (bell, jalapeño, or your favorites!).
- ● Fertilizer: A balanced 10-10-10 or 5-10-10 fertilizer (1-2 lbs per 100 sq ft) or organic options like fish emulsion or worm castings.
- ● Mulch: Straw or shredded leaves (2-3 inches thick) to retain moisture and suppress weeds.
- ● Garden Trowel: For digging small holes and transplanting seedlings.
- ● Garden Gloves: A pair to protect your hands from dirt and thorns.
- ● Pruners: Sharp, clean pruners for trimming and harvesting.
- ● Watering Can or Hose: With a gentle spray nozzle for even watering.
- ● Measuring Tape: To ensure proper spacing between plants (18-24" for tomatoes, 12-18" for peppers).
- ● Stakes or Cages: 4-6 tomato cages (5-6 ft tall) or bamboo stakes (5-7 ft long) for support.
- ● Drip Irrigation Kit: For automated, efficient watering.
- ● Row Cover or Shade Cloth: To protect seedlings from pests or harsh sun.
- ● Epsom Salt: For a magnesium boost (1 tbsp per plant every 2-3 weeks).
- ● Companion Plants: Basil, marigolds, or onions to enhance growth and deter pests.
- ● Garden Journal: To track progress, watering schedules, and plant health!
Step-by-Step instructions for designing a tomato and pepper garden layout
Here's how I organize my garden to maximize sunlight and companion benefits.
🪴 Step 1: Map Your Garden Space and Sunlight Patterns
Start by sketching your garden bed on paper, marking where the sun hits at different times of day. Tomatoes and peppers need 6-8 hours of direct sunlight, so I focus on the sunniest spots first. Observe your space for 2-3 days to note how shadows shift—what looks sunny at noon might be shaded in the morning or afternoon.
Divide your bed into zones: full sun (6+ hours), partial sun (4-6 hours), and shade. Place taller plants like tomatoes on the north side of the bed (in the Northern Hemisphere) so they don’t shade shorter peppers. I always draw arrows showing sun direction to visualize how plants will interact as they grow.
☀️ Step 2: Group Plants by Sunlight Needs and Height
Place tomatoes and peppers in the sunniest zones, but stagger their positions to create airflow. I group indeterminate tomatoes (vining types) on one side of the bed and determinate tomatoes (bush types) near peppers. Peppers thrive in consistent sunlight, so I avoid placing them in areas where shadows from taller plants might appear later in the season.
Leave 18-24 inches between tomato plants and 12-18 inches between peppers to prevent crowding. I use a tape measure to mark planting spots and adjust based on mature plant sizes listed on seed packets. This spacing keeps plants healthy and makes harvesting easier.
🌿 Step 3: Integrate Companion Plants for Pest Control and Growth
Add companion plants like basil, marigolds, or onions around tomatoes and peppers to deter pests naturally. I plant basil near tomatoes because it repels whiteflies and improves flavor, while marigolds around peppers keep aphids away. Avoid planting fennel or dill nearby—these herbs can stunt pepper growth.
Interplant fast-growing crops like lettuce or radishes in the gaps between slower-growing tomatoes and peppers. These "living mulches" shade the soil, retain moisture, and prevent weeds. I also sprinkle a light layer of mulch (like straw) around plants to keep roots cool and reduce watering needs.
⏰ Step 4: Plan for Successive Planting and Seasonal Shifts
If your growing season is long, plan for staggered planting. I start tomatoes indoors 6-8 weeks before the last frost and transplant them first, followed by peppers 2-3 weeks later. This ensures both crops get enough sunlight without competing for space early in the season.
Leave room for late-season additions like bush beans or spinach, which can fill gaps once tomatoes and peppers are established. I sketch a simple timeline on my garden map, noting when each plant will be ready to harvest and when new crops can take their place.
💧 Step 5: Test Your Layout Before Planting
Walk through your layout with a critical eye. Check if taller plants will block sunlight from shorter ones as they grow, and ensure pathways are wide enough for easy access. I use wooden stakes to mark plant positions temporarily, then step back to visualize the final arrangement.
Adjust as needed—sometimes moving a single plant can make a big difference in airflow or sunlight exposure. Once satisfied, I transfer the layout to the garden using a garden hose or string to outline beds and planting spots. This step saves time and frustration later in the season.
Tips & tricks for perfect tomato and pepper garden layouts
Between us, the biggest mistake I see in vegetable gardens is ignoring how plants will grow together—not just where they start. Here's what I've learned after years of trial and error.
Sunlight Mapping: Step 1 is where most gardeners trip up. I can't stress enough how much those 2-3 days of observation pay off—trust me, that afternoon shade you missed could ruin your pepper harvest. Use a white board or even a phone app to track sunlight patterns at different times. I mark my garden with chalk every hour to visualize how shadows move. This isn't just about sunlight hours; it's about understanding how your space changes throughout the day.
Plant Height Strategy: The spacing in Step 2 is crucial, but I've found the real secret is in the arrangement. Place your tallest indeterminate tomatoes on the north side (Northern Hemisphere) and work your way down in height toward the south. This creates a natural staircase of sunlight exposure. I've seen peppers in the shade of tomatoes struggle—don't let that happen to you. Pro tip: Use bamboo stakes to temporarily mark plant heights before transplanting to visualize the final arrangement.
Companion Plant Placement: When integrating companions in Step 3, think vertically as much as horizontally. I plant basil in hanging baskets near tomatoes to maximize pest control without taking up garden real estate. For peppers, I interplant with marigolds but keep them slightly behind the pepper plants so they don't compete for sunlight. The key is creating layers—your garden should look like a forest, not a flat field. I've also found that planting onions between pepper rows deters aphids without blocking sunlight.
Seasonal Transition Planning: That 6-8 week start time for tomatoes in Step 4 is non-negotiable, but here's what nobody tells you: use a garden journal to track when your plants will reach their peak production. I mark my calendar with colored dots for each plant's harvest window. This helps me plan for succession planting and ensures I'm not left with empty spaces when early crops finish. For example, I always schedule bush beans to go in right after my pepper harvest begins to fill those gaps.
Pro Tips for Tomato And Pepper Garden Layout
- Between us, the biggest mistake I see in vegetable gardens is ignoring how plants will grow together—not just where they start.
- Sunlight Mapping: Step 1 is where most gardeners trip up.
- Plant Height Strategy: The spacing in Step 2 is crucial, but I've found the real secret is in the arrangement.
Frequently asked questions
Got questions about designing your tomato and pepper garden layout? You’re not alone! Here are answers to the most common queries to help you grow a thriving, sun-drenched harvest.
How close can I plant tomatoes and peppers together?
Keep tomatoes and peppers at least 18–24 inches apart to ensure good airflow and sunlight access. Peppers prefer slightly more space (24–36 inches) since they spread wider. If space is tight, opt for bush varieties or use container gardening to avoid overcrowding. Overcrowding invites pests and disease—so leave room to breathe!
When is the best time to plant tomatoes and peppers?
Timing depends on your climate! Plant peppers after the last frost when soil is at least 60°F (15°C)—they’re heat-lovers. Tomatoes can handle slightly cooler soil (50°F/10°C) but thrive in warm conditions. For cooler zones, start seeds indoors 6–8 weeks before transplanting. Use row covers if early frosts are a risk.
What are the best companion plants for tomatoes and peppers?
Pair tomatoes and peppers with basil, marigolds, onions, or garlic to deter pests and boost growth. Avoid planting near fennel or brassicas (like cabbage), as they stunt pepper production. Herbs like thyme or oregano also make great neighbors—they repel insects and add flavor to your harvest!
Why are my peppers or tomatoes turning yellow or wilting?
Yellowing leaves often signal overwatering, underwatering, or nutrient deficiencies. Check soil moisture—peppers and tomatoes prefer consistent moisture (1–2 inches of water weekly). Wilting can also mean root stress, pests (like aphids), or disease (early blight). Prune affected leaves, improve drainage, and apply balanced fertilizer (like 10-10-10) if needed.
Can I grow tomatoes and peppers in containers?
Use 5-gallon containers or larger for tomatoes (they need depth) and 3–5 gallon pots for peppers. Ensure pots have drainage holes and use well-draining potting mix. Place containers in full sun (6+ hours daily) and fertilize regularly. Dwarf or bush varieties (like ‘Tiny Tim’ tomatoes or ‘Jalapeño M’) work best in small spaces.
What should I do if my garden layout isn’t working?
Start fresh! Assess sunlight (both crops need 6–8+ hours daily), adjust spacing, or rotate crops next season to prevent soil depletion. If pests are rampant, try intercropping with pest-repellent plants (like nasturtiums) or use organic sprays (neem oil). Sometimes, a simple rearrangement or soil amendment (compost, worm castings) works wonders!
Wrapping up and next steps
Designing a tomato and pepper garden layout that maximizes sunlight and companion plant harmony is a rewarding way to boost your harvest while keeping pests at bay. 🌱 By following these steps—choosing the right location, spacing plants strategically, and pairing them with beneficial companions—you’ll create a thriving, low-maintenance garden that yields delicious results.
Now that you’re armed with the knowledge, it’s time to roll up your sleeves and get planting! Start small if you’re new, and don’t forget to track your progress for future improvements.
🌟 Ready to Grow?
- Sketch your garden plan on paper or use a free app like Garden Planner.
- Gather your tools and materials—you’ve got this!
- Share your layout ideas in the comments or with fellow gardeners for feedback.