
Container Gardens
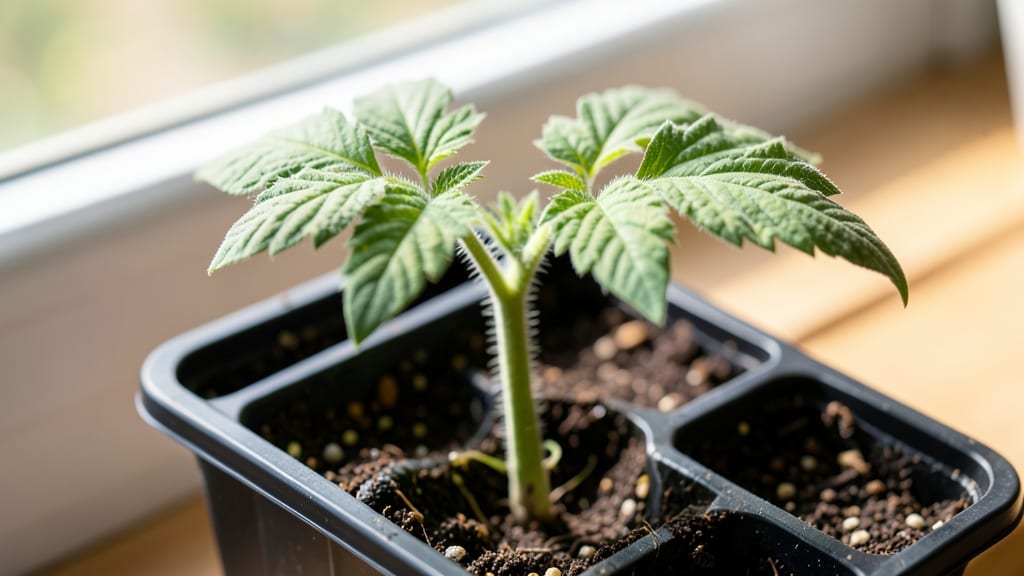
Growing tomato seedlings at home means fast germination—plump, dark-green sprouts breaking through soil in just 7 days instead of the usual two weeks. 🌱 I learned the hard way that patience isn’t the key; it’s the right temperature, moisture, and a little trick with the soil that makes all the difference.
The secret starts with a warm spot—like a seedling heat mat or even a sunny windowsill with a clear plastic dome to trap heat. Too cold, and seeds sulk; too hot, and they rot.
Keep the soil barely damp (like a wrung-out sponge) and watch those first leaves unfurl in less than a week. Most beginners overwater or let the soil dry out—both kill seedlings before they even stand up.
By day 10, you’ll have sturdy little plants with their first true leaves, ready to handle gentle light and a taste of fertilizer. These won’t be the spindly, weak starts you’d buy at a nursery; they’ll be bold, compact, and eager to grow.
The payoff? Transplanting them outdoors means less shock and faster fruit production. This method works for any tomato variety—cherry, beefsteak, or heirloom—and scales from a single seedling to a whole tray. Ready to skip the nursery and grow your own? Let’s get those seeds going!
📚 In This Guide
- What you need
- Instructions
- Tips and common mistakes
- Wrapping up and next steps
What you need
- ● Tomato seeds: 10–20 seeds (depending on desired yield; heirloom or hybrid varieties work best).
- ● Seed-starting mix: 2–3 cups of sterile, seedling-specific potting mix (avoid garden soil—it’s too dense!).
- ○ Containers: 2–4 small pots (2–3 inches deep) or a seed tray with cells (3–4 inches deep). Optional: Clear plastic domes or plastic wrap for humidity.
- ● Water: Room-temperature, dechlorinated water (let tap water sit out for 24 hours or use filtered water).
- ● Grow lights or sunny windowsill: A full-spectrum LED grow light (12–16 hours/day) or a south-facing window (6+ hours of direct sunlight).
- ● Spray bottle: For gentle watering (avoids disturbing seeds).
- ● Heating mat: A seedling heat mat (70–80°F) to speed up germination.
- ● Fertilizer: A balanced, water-soluble fertilizer (5-5-5 or 10-10-10) diluted to half-strength for first feeding.
- ● Toothpicks or chopsticks: For supporting seedlings as they grow (if using deep containers).
- ● 🌡️ Temperature control: Keep seeds at 70–85°F for fastest germination (a warm spot like on top of the fridge works in a pinch!).
- ● ✨ Light hack: If using a windowsill, rotate trays daily for even growth.
- ● 🔥 Humidity boost: Cover containers with plastic wrap or a dome until sprouts appear (3–7 days).
Step-by-step instructions for growing tomato seedlings
Here's how I get tomato seeds sprouting in just a week—no waiting months for slow germination.
🌱 Step 1: Soak Seeds Overnight for Faster Sprouting
Place 4 tomato seeds in a small bowl and cover them with lukewarm water for 12 hours. The outer coating slows germination, and a soak softens it considerably. You'll see the seeds plump up slightly—this is your signal they're ready. I like to use a mesh strainer so they don't sink to the bottom.
After soaking, drain the seeds but keep them damp in a paper towel. Fold the towel around them and place it in a sealed plastic bag. Store this in a warm spot, like on top of the fridge. Check daily—they should sprout within 2-4 days. If they dry out, mist them lightly again. This warm, moist environment mimics spring conditions, which is exactly what tomato seeds crave.
🪴 Step 2: Prepare Containers and Plant the Germinated Seeds
Fill 4 small biodegradable pots (2-3 inches deep) with seed-starting mix—not garden soil. Press the mix down lightly so it's firm but not compacted. Make a tiny hole with your finger about ¼ inch deep in each pot. This depth ensures seeds don't get buried too deeply, which can delay sprouting.
Gently place one sprouted seed into each hole, being careful not to damage the tiny root. Cover it with a sprinkle of additional mix, just enough to hold the seed in place. Water lightly with a spray bottle until the soil looks evenly moist. Don't overwater—you want the soil damp, not soggy. Place the pots in a warm spot, like on a seedling heat mat set to 75-85°F, to encourage quick growth.
☀️ Step 3: Provide Warmth and Light for Rapid Growth
Keep the pots covered with a clear plastic dome or plastic wrap to retain warmth and moisture. Check daily for condensation on the dome—this means the humidity is just right. Remove the dome as soon as you see the first true leaves appear, usually within 5-7 days. This prevents damping-off, a fungal disease that can kill seedlings overnight.
Move the seedlings under a grow light immediately after the dome comes off. Position the light 2-4 inches above the plants and leave it on for 14-16 hours daily. Without enough light, seedlings grow leggy and weak. You'll know the light is working if the seedlings stay short and stocky with dark green leaves. Rotate the pots daily so they grow straight instead of leaning toward the light.
💧 Step 4: Water and Fertilize for Strong Seedlings
Water the seedlings when the top inch of soil feels dry. Use a spray bottle to avoid disturbing the soil or washing it away. I always water in the morning so the soil has time to dry out slightly before nightfall, which helps prevent disease. Overwatering is the biggest mistake—it causes roots to rot and seedlings to collapse.
After the second set of true leaves appears (about 10-14 days after planting), fertilize with a diluted liquid fertilizer (half-strength). This gives them a gentle nutrient boost without burning tender roots. I use a balanced fertilizer like 10-10-10, but any starter fertilizer will work. Fertilize every 2 weeks until you transplant the seedlings outdoors.
⏰ Step 5: Harden Off Before Transplanting Outdoors
Start hardening off the seedlings 2 weeks before the last frost date. Place them outside in a sheltered spot for 1-2 hours the first day. Gradually increase their time outside by 1 hour daily until they can stay out all day. This slow acclimation prevents shock and helps them adjust to wind and sun.
Watch for signs of stress, like wilting or yellowing leaves. If you see this, bring them back inside for a day and try again the next day. Once they're hardened off, they're ready for the garden. Transplant on an overcast day or in the late afternoon to reduce stress. Keep the soil moist for the first week after transplanting to help them establish roots quickly.
Tips & tricks for growing tomato seedlings
Took me years of trial and error to perfect these tricks—here's how to avoid the common pitfalls with tomato seedlings.
Soaking Secret: The 12-hour soak is non-negotiable for fast germination, but here's the thing: if your seeds are extra tough (like heirloom varieties), you can extend this to 24 hours. Just don't go beyond that—too long and you risk breaking the seed coat. I like to use a small glass of water in a warm place (like on top of the fridge) so I can see the seeds plump up. That's your visual cue they're ready for planting.
Heat Mat Hack: That 75-85°F range on your seedling heat mat is perfect, but here's what nobody tells you—place a thermometer right next to the pots to monitor the actual soil temperature. The mat's surface temperature can be misleading. If your home runs cool, consider using a small space heater with a thermostat to maintain consistent warmth. Tomato seeds need that steady heat to germinate quickly.
Light Positioning: The 2-4 inch distance from your grow light is crucial, but here's my game-changer: adjust it as your seedlings grow. When they reach about 2 inches tall, lower the light to 1-2 inches. This prevents leggy growth while still providing enough light intensity. I rotate my pots every 12 hours instead of daily—it saves time and still keeps them straight.
Fertilizer Timing: Wait for those second true leaves before fertilizing—that's about 10-14 days after planting. But here's the rescue strategy: if your seedlings look pale or stunted before then, you can give them a very weak solution (quarter-strength) about 7 days after planting. The key is to never fertilize dry soil—always water first, then fertilize. This prevents root burn that can kill tender seedlings.
Pro Tips for Growing Tomato Seedlings
- Took me years of trial and error to perfect these tricks—here's how to avoid the common pitfalls with tomato seedlings.
- Soaking Secret: The 12-hour soak is non-negotiable for fast germination, but here's the thing: if your seeds are extra tough (like heirloom varieties), you can extend this to 24 hours.
- Heat Mat Hack: That 75-85°F range on your seedling heat mat is perfect, but here's what nobody tells you—place a thermometer right next to the pots to monitor the actual soil temperature.
Frequently asked questions
Got questions about growing tomato seedlings? You’re not alone! Here are answers to the most common concerns—from speedy germination to troubleshooting weak starts.
How soon can I expect tomato seeds to germinate?
Most tomato seeds sprout within 5–10 days under ideal conditions (warmth, moisture, and light). If your setup is perfect (70–80°F soil, indirect light), you might see tiny sprouts in just 3–5 days! Patience is key—some varieties are slower.
What if my seedlings take longer than a week to sprout?
Don’t panic! Cold soil (<60°F), dry conditions, or old seeds can delay germination. Try re-moistening the soil, moving trays to a warmer spot (like near a heater or under grow lights), or gently pressing seeds deeper (¼ inch) for better contact. If still no luck after 2 weeks, they may not be viable.
Can I use regular potting soil for tomato seedlings?
Yes, but amend it for better results! Mix in perlite or vermiculite (20%) for drainage and a handful of compost or worm castings for nutrients. Avoid garden soil—it can compact and harbor diseases. A seed-starting mix is ideal for the first 4–6 weeks.
Why are my seedlings leggy or weak?
Leggy seedlings usually mean too little light. Move them 2–3 inches from grow lights (12–16 hours/day) or place near a sunny window. Overwatering or cool temps can also weaken them. Once true leaves appear, fertilize lightly (half-strength balanced formula) to boost growth.
Should I transplant seedlings too soon?
Wait until seedlings have 2–3 sets of true leaves (not cotyledons—the first baby leaves) and are 3–4 inches tall. Harden them off 5–7 days before transplanting by placing outside in shade for a few hours daily. Transplanting too early stresses roots and stunts growth.
Pro Tip:
Label your seedlings immediately with variety names and dates! Tomato plants look similar until they fruit, and tracking growth stages helps you adjust care (like pruning or staking) at the right time. Use toothpicks and masking tape for a DIY solution.
Wrapping up and next steps
Growing tomato seedlings in just 7 days is totally doable with the right care and patience! 🌱 By following these steps—from soaking seeds to hardening off your sturdy starts—you’ll set yourself up for a thriving harvest.
Remember, consistency is key, but don’t stress if things take a little longer; even the most seasoned gardeners face hiccups.
Now that you’ve got the basics down, it’s time to take the next step. Once your seedlings are strong and ready, transplant them into your garden or containers and watch them flourish! Happy growing—your future tomatoes are waiting for you. 🍅✨