
Pruning
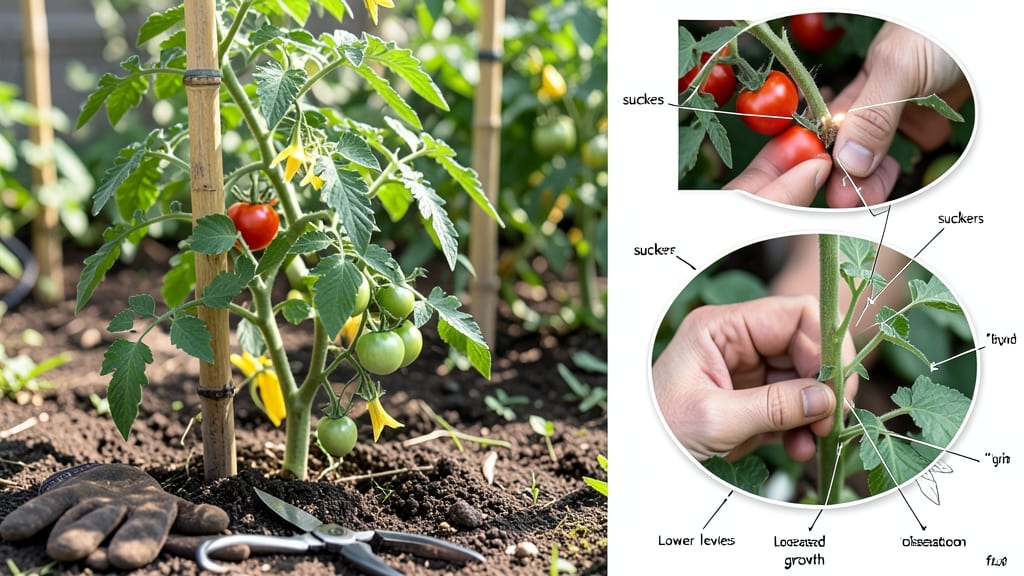
Check out this tomato pruning diagram—your tomato plants can produce 30% more fruit just by making three simple cuts. ✂️ Pruning tomatoes isn’t about trimming for looks—it’s about directing energy where it matters most: to bigger, healthier fruit and stronger stems.
I’ve been pruning since my first garden, and the difference between pruned and unpruned plants is night and day by midsummer.
The goal is to create an open, airy plant that lets sunlight reach the lower leaves and prevents disease. Start by removing suckers—those little shoots that grow between the main stem and branches—when they’re about 2 inches long.
These energy vampires drain your plant instead of letting it focus on fruit production. Keep only the strongest branches, and never prune more than one-third of the plant at once.
By the time you’re done, your plant will look like a well-groomed bush instead of a tangled mess. You’ll see more flowers, fewer cracked tomatoes, and a harvest that keeps coming until frost. The key is consistency—check your plants weekly during peak growing season and adjust as they grow.
This method works for indeterminate tomatoes (the vining types like Sungold or Cherokee Purple) and even some determinate varieties. Just skip the heavy pruning if you’re growing bush types like Roma or Celebrity—they produce fruit along the entire stem. Now grab those shears and let’s get pruning!
📚 In This Guide
- What you need
- Instructions
- Tips and common mistakes
- Wrapping up and next steps
What you need
- ○ Pruning shears or scissors: Sharp, clean, and sterilized (bypass pruners work best; avoid dull tools that crush stems). Optional: Small handheld pruners for precision cuts.
- ○ Gloves: Heavy-duty gardening gloves (to protect against thorns and dirt). Optional: Nitrile-coated gloves for extra grip.
- ● Disinfectant: Rubbing alcohol (70%+) or a garden disinfectant (to sterilize tools between cuts and prevent disease spread).
- ● Tomato pruning diagram: Printed or digital reference (use our step-by-step guide or a trusted source like University Extension Service diagrams).
- ● Notebook & pen: For tracking pruning dates and plant progress (helps monitor growth patterns over time).
- ● Plant ties or twine: Soft garden twine or Velcro plant ties (to support stems after pruning and prevent breakage).
- ○ Growth regulator (optional): Like seaweed extract or hydrogen peroxide spray (to reduce stress post-pruning).
- ● Mulch: Straw, wood chips, or shredded leaves (to retain moisture and protect roots after heavy pruning).
- ● Camera or phone: For before/after photos (document your pruning progress—it’s oddly satisfying!).
- ● ✅ Healthy tomato plants: Prune only after the plant has established 3–4 main stems (usually 4–6 weeks post-transplant).
- ● ✅ Good weather: Prune on a dry, cloudy day (avoid pruning in direct sun or rain to reduce stress and disease risk).
- ● ✅ Patience: Tomato pruning is a gradual process—don’t rush! Follow the diagram’s timing cues.
Step-by-step tomato pruning for bushier, healthier plants
Here's how I prune tomatoes to boost fruit production and keep plants strong—no guesswork, just clear cuts.
🌿 Step 1: Identify the Main Stem and First Pruning Points
Start by locating the main stem (the thick central vine) and the first set of leaves. The first pruning happens above the first leaf cluster, about 12-18 inches from the base. This encourages the plant to branch out lower, producing more fruit-bearing stems. I use clean, sharp pruners to make a 45-degree cut just above a leaf node—this prevents water from pooling and rotting the wound.
Look for the sucker (the small shoot growing between the main stem and a branch). This is where you'll focus most of your pruning. If you see a sucker larger than 1/4 inch thick, it's already competing with the main plant and should be removed immediately. The first few weeks are critical—don't wait until suckers get too big.
✂️ Step 2: Remove Suckers Consistently Every 2-3 Weeks
Pinch or cut suckers when they're 2-4 inches tall—this prevents them from draining energy from the main plant. I check my plants every 7-10 days during warm weather, as new suckers grow fast. Always remove the entire sucker down to the base; leaving a stub can lead to disease. For determinate (bush) tomatoes, skip this step—they don't benefit from pruning.
Watch for the first flower cluster—once it appears, reduce pruning above it. Pruning too aggressively above flowers can stress the plant and reduce yield. Here's the thing: determinate tomatoes produce fruit along the main stem, while indeterminate varieties need pruning to direct energy to fewer, larger fruit. Know your variety first!
🌱 Step 3: Prune for Airflow and Light Penetration
After the first flower cluster, focus on removing leaves that shade the lower stems. Aim to keep the lower 12-18 inches of the plant bare of leaves—this improves airflow and reduces disease risk. I remove only the largest leaves that block sunlight from reaching the fruit. Never strip all leaves; tomatoes need foliage for photosynthesis.
For indeterminate varieties, I leave 3-4 main stems (the strongest branches) and prune everything else. This creates a balanced plant that produces heavy fruit without toppling. If you see a stem growing toward the ground, prune it—it won't produce fruit and wastes energy. The goal is a bushy, upright plant with open space between branches.
☀️ Step 4: Support and Train the Plant as You Prune
Use a sturdy cage or stake to support the main stem as it grows. Tie the stem to the support at 12-inch intervals with soft plant ties. This prevents the plant from flopping over under the weight of fruit. I adjust ties every 2-3 weeks as the stem thickens—too-tight ties can girdle the plant and kill it.
If your tomatoes grow tall, consider a floral wire trellis for better support. The key is to prune and train simultaneously. As you remove suckers, gently weave the remaining branches through the support. This keeps the plant compact and makes harvesting easier. Never let branches drag on the ground—they'll rot and spread disease.
⏰ Step 5: Adjust Pruning as the Season Progresses
In late summer, reduce pruning to allow the plant to focus on ripening existing fruit. I stop removing suckers entirely 6-8 weeks before your first frost—this gives the plant time to mature remaining fruit. For greenhouses or extended seasons, continue light pruning to maintain airflow until harvest.
If your plant shows signs of stress (yellowing leaves, wilting, or slow growth), stop pruning immediately. Stress + open wounds = disease entry points. Here's the rule I follow: if the plant looks tired, prune only dead or diseased growth and let it recover. The last thing you want is a weakened tomato plant struggling to produce fruit.
Tips & tricks for perfect tomato pruning
Here's what nobody tells you about pruning tomatoes—these tricks keep your plants thriving without the guesswork.
Tool Prep is Everything: Sterilize your pruners with rubbing alcohol before you start. I learned this the hard way after my plants developed bacterial spots from dirty tools. A quick wipe between plants prevents spreading disease. For a sharper cut, angle your pruners at 45 degrees just above a leaf node—this creates a smaller wound that heals faster and reduces rot risk.
Sucker Size Matters: The instructions mention removing suckers when they're 2-4 inches tall, but here's the secret: smaller is always better. I remove suckers as soon as they're 1 inch tall—this prevents them from stealing energy from your main plant. Think of it like weeding: the smaller the problem, the easier it is to manage.
Timing is Critical: Those 7-10 day checks during warm weather are non-negotiable—new suckers can appear overnight in hot conditions. I set a reminder on my phone for every 7 days until the first flower cluster appears. For cooler climates, you can stretch this to 10-14 days since growth slows down naturally.
Support System Check: When tying your plant to stakes at 12-inch intervals, use soft plant ties that you can easily adjust. I've ruined plants with ties that cut into the stem as it thickened. Test the tightness by trying to slide your finger between the tie and stem—it should move freely. This prevents girdling, where the tie cuts off circulation and kills the plant.
Pro Tips for Tomato Pruning Diagram
- Here's what nobody tells you about pruning tomatoes—these tricks keep your plants thriving without the guesswork.
- Tool Prep is Everything: Sterilize your pruners with rubbing alcohol before you start.
- Sucker Size Matters: The instructions mention removing suckers when they're 2-4 inches tall, but here's the secret: smaller is always better.
Frequently asked questions
Got questions about tomato pruning? You’re not alone! Whether you're a beginner or just looking to refine your technique, here are some common concerns—and clear answers—to help you prune like a pro.
Why should I prune my tomatoes at all?
Pruning encourages stronger, bushier plants with more fruit and better airflow. Without it, tomatoes can become leggy, overcrowded, and prone to disease. Plus, indeterminate varieties (like cherry tomatoes) rely on pruning to keep producing all season! Skip it, and you might end up with fewer, smaller tomatoes.
When is the best time to prune tomatoes?
Start pruning when your plants are about 12–18 inches tall and have a few sets of leaves. For indeterminate tomatoes, prune regularly (every 1–2 weeks) throughout the growing season. For determinate varieties (like Roma or beefsteak), minimal pruning is needed—just remove suckers if desired. Never prune after the first frost or when flowers/fruit are already forming.
What’s the difference between suckers and leaves I should remove?
Suckers are the small shoots that grow in the V-shape between the main stem and a branch. These compete for nutrients and should be pinched off. However, never remove the first few sets of leaves near the base—they’re essential for photosynthesis. Focus on keeping the plant’s energy on fruit production, not extra foliage.
Can I prune tomatoes too much? What are the signs?
Yes! Over-pruning stresses plants, leading to stunted growth, fewer flowers, or even death. Signs include yellowing leaves, slow growth, or no new fruit. Stick to the 30–50% foliage rule: never remove more than half the plant’s leaves. If you’ve gone overboard, stop pruning immediately and focus on watering and fertilizing.
Do I need special tools, or will regular scissors work?
While clean, sharp pruners or shears work best, you can use scissors or even your fingers for small suckers. Just ensure your tools are sterilized (rubbing alcohol works) to prevent disease spread. Avoid tearing stems—make clean cuts just above a leaf node (the bump where leaves grow). Pro tip: Prune on a dry day to speed up healing.
What if my tomato plant looks sad after pruning?
Don’t panic! A little shock is normal, but your plant should bounce back in 3–7 days with proper care. Water deeply, add a balanced fertilizer (like 10-10-10), and keep it in full sun. If leaves wilt severely or turn brown, reduce pruning and focus on recovery. Think of it like a haircut—sometimes you need a trim to grow even better!
Wrapping up and next steps
Mastering tomato pruning with a tomato pruning diagram is your ticket to a thriving, productive garden! 🌱 The key takeaway? Focus on removing suckers, thinning foliage, and shaping your plant for better airflow and sun exposure—all while keeping stress minimal.
With practice, you’ll grow bushier, healthier tomatoes that reward you with an abundance of fruit.
Ready to put your new skills to work? Grab your pruners, reference your diagram, and start pruning with confidence. Your next step: Observe your plants weekly and adjust as they grow—your future harvest will thank you!